As any wise blogger knows, one of the best ways to direct more traffic into one’s blog is by sharing their blog posts on popular social sites like Facebook. However, even with the promising results that this practice brings, some bloggers still don’t do it as much, or enough at all. Why? Because they find it to be too troublesome.
One way to solve this problem is by offering them a means of doing it automatically. So how is this accomplished? With the help of a Facebook app called RSS Graffiti!
All it takes is for you to log in to Facebook, proceed to the app’s page, and then just fill up the form with all of the necessary information it requires to run the app. If you’re worried about getting lost in the process, don’t fret! Blogger user Gayan Dulantha has created a nice, easy-to-follow guide that’ll help you go about the process.
You can find his instructions here:
Step 1: Add the RSS Graffiti App
The first step is to log into Facebook and add the RSS Graffiti app to your profile. Although the Facebook app library includes several RSS tools, I chose RSS Graffiti because it had a large base of existing users and was well reviewed. Having used it now for a few years, I consider myself a fan.
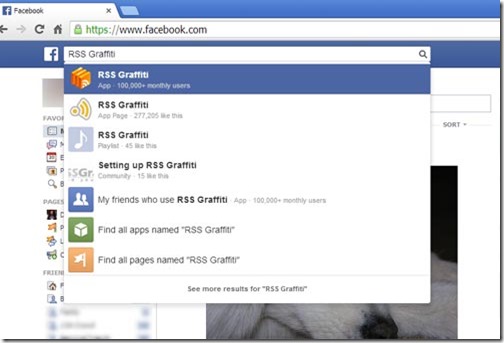
I think the easiest way to find RSS Graffiti is to just type the app name into the search bar at the top of your Facebook home page, as shown below.

Select the “app” item, which is the top item of the list shown above.
What you see next will be the App page for RSS Graffiti, and you’ll have to click a button that says you want to add it to your account. The way that works varies by app, and I can’t show you that particular screen because I already had the app loaded.
Step 2: Add a Publishing Plan
One of the cool features of RSS Graffiti is that it supports multiple feeds. That means you could, for example, configure it to link your personal blog to your primary Facebook profile and your author blog to your author page.

Click the “Add New Publishing Plan” button to get started on your first feed.
Step 3: Name the Publishing Plan
Since you can have multiple publishing plans, you should name each one so they clearly state which blog or Facebook account they are configured to use.

Enter a name in the “Name New Publishing Plan” field. I chose to name my plan based on the page I’m going to be updating with the feed.

RSS Graffiti returns to the Publishing Plans view, showing you the new plan you just set up. At this point, I have a publishing plan that does nothing. I still need to tell the app where to get my blog posts and where to post Facebook links .
Click the “New Source” button to set up the RSS feed for your publishing plan.
Step 4: Configure the Feed Source
Most blog software publishes one or more RSS feeds that contain information about blog posts and/or comments. For example, if you add “/feed” to the end of just about any WordPress blog URL, your browser will show you the WordPress RSS feed for that blog’s posts (e.g. http://www.DanielRMarvello.com/feed).

Enter the URL of your blog’s RSS feed into the Add a New Source window, and click the Add Source button.
RSS Graffiti will try to read the feed from the URL you entered. If it was successful, it will display more fields in the Add a New Source window, as shown below.

The app should get the Feed Title from your RSS feed, but you can override the name or enter it yourself.
You can also configure how many posts you want the app to publish at one time and how you want the posts ordered per update. (These figures tie in with your publishing frequency, which I’ll get to in a later step.) I chose to publish just one post at a time, even if multiple posts were waiting to be published (which would be rare for me). Also, I wanted older posts published first so the posts would show up on my page in the same order I published them on my blog.
Advanced Source Options
You can access more configuration options by clicking the “Advanced” tab at the top of the Add a New Source window.

By default, the “Cut-off date/time” is the time you configured the source, which means it will only get future blog posts. If you want RSS Graffiti to grab older posts, set the cut-off time back as far as necessary.
You can also set the “Publish Delay,” which controls how old the post must be before RSS Graffiti will publish it. I set the Publish Delay to 15 minutes so I’d have time to fix “oops moments” where I notice a mistake right after I publish the post to my blog.
Once you are done, click the Save button to save your source feed configuration.

RSS Graffiti returns you to the Publishing Plans list, and now the plan shows the source you just set up.
Step 5: Configure the Facebook Target
Now you need to tell RSS Graffiti where to publish the links on Facebook. Click the New Target button (shown in the image above) to do that. The app displays the Add a New Target window.

Setting up a target is simple compared to setting up a source.
With the “Choose Target” drop-down, you can select a user profile, a page, or even a group. I chose to publish to my Daniel R. Marvello author page.
You can also control who publishes the links on Facebook. You can publish as your user profile name or as any of the pages your account owns. I chose to publish as my Daniel R. Marvello page.
Once you have configured the target, click the Save Changes button.

RSS Graffiti returns you to the Publishing Plans list, and now your plan has both a source and a target.
Step 6: Configure the Publishing Frequency
I’m trying to keep this tutorial simple, so I haven’t gone into every configuration option you can set with RSS Graffiti. However, I think you should know how to set the frequency with which the app “polls” your blog for new content.
Bear with me for a moment and click the Publishing Plan Scheduling icon in the upper right of your Publishing Plan listing. (It’s the little clock icon, third from the right.)

With the free version of RSS Graffiti, you can poll for new posts from “Every half an hour” to “Once a week.” The default is “Four times a day,” which was fine for me. Click the Save Changes button after you select a “Publish no faster than” setting.
Congratulations! You completed all of the steps needed to configure a publishing plan.
Step 7: Make It So
Now that you have a fully-configured publishing plan, all you have to do is turn it on. The Publishing Plan listing has a button in the center that toggles your plan on and off. Click the “OFF” button to enable the plan.

RSS Graffiti redisplays your publishing plan in brighter colors and toggles the OFF button to ON, as shown above.
The Hard Part
Now for the hard part. You have to go write a blog post. Then you have to wait. Which of those is hardest depends upon how fast a writer you are and how patient you are.
Here’s a tip for the control freaks among us: set the publishing delay for your source to zero and the publishing frequency of the plan to “Every half an hour.” That way, it should take no more than half an hour for your post to appear on Facebook once you publish it. If you really can’t stand waiting, set the source cut-off date to just before your most recent post. Then you won’t even have to go write a new blog post. You can always reconfigure these settings after you get proof of concept.
*****
I hope this tutorial was helpful. The method presented here is not the only way to connect your blog to your Facebook timeline, but it has worked well for me for years now.
laptop repair service in goregaon west
ReplyDeletelaptop repair service in malad west
laptop repair service in wadala
lenovo laptop charger shop near goregaon
DELL LAPTOP BATTERY REPLACEMENT MUMBAI
laptop repair service in lokhandwala andheri west
laptop repair service in oshiwara jogeshwari west
laptop repair service in chandivali powai
laptop repair service jankalyan nagar malad west